You receive the email with your license confirmation, feeling pleased you continue and look to get these installed and running as quickly as possible. It can be disheartening when you are not given much information with regards to how your new Network licenses are to be installed…
This is why I am writing this blog, to help users create and understand how license files work, and how they are used to run Network licenses. More importantly, I am writing this to help users create their own license files with ease.
Autodesk License files contain all the information needed to configure your server so you can run distributed Network licenses. This file will sit on your server and will allow your specified number of users to run the software on the individual computers until the last session is closed, and the license will then be released back to the server.
By following the instructions below, this will prove how easy it can be to create from your own Autodesk Account:
Server Details
Firstly, you will need to collect your server details before creating the license file. It will ask for the Server Name and also the Server Physical Address. Noted this down for use a little later on.

Autodesk Account
Log in to your Autodesk Account (make sure you are the contract manager for this step).
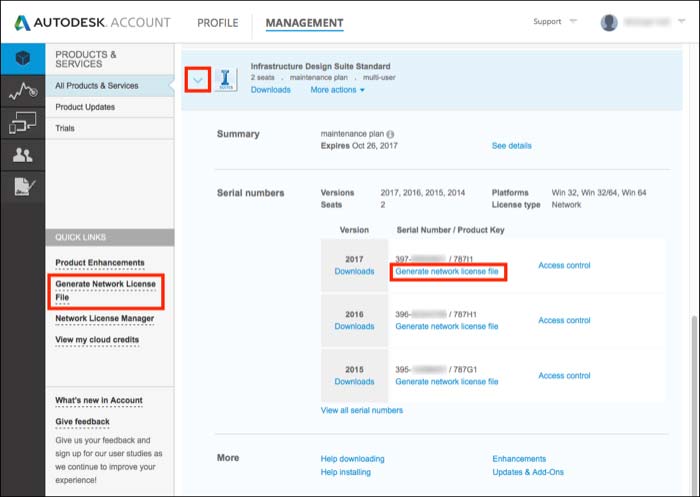
Browse to the Management Area and see Quick Links on the left hand side.
You will see Generate Network License File, click here.

Server Configuration
At this point, there are thee different Server Models you can choose. Single Server, Redundant Server or Distributed Server model. Depending on which server configuration you have set up, please choose the relevant one.
For this example we will stick with the Single Server model. This is most widely used for customers with Network Licenses.
As shown in the image, you will be asked to enter your server details. You have these already noted down from before. Server Name and Server ID (physical address).

Product Information
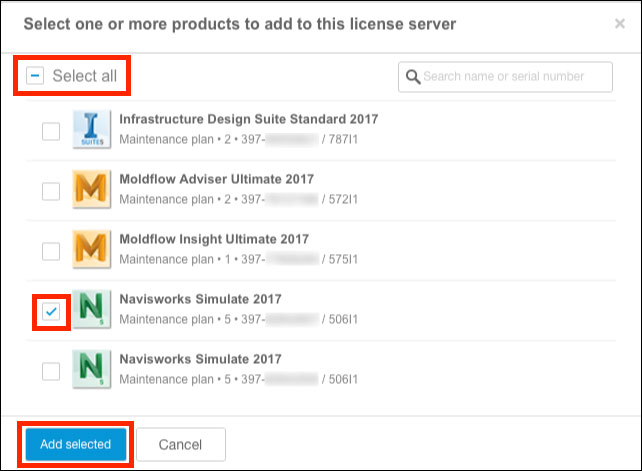
You will then be asked to select relevant products you would like included with your new license file.
Choose from your list of products and click Add Selected.
Please then simply select ‘Get License File’

Your license file has now been generated, you will see this appear on your screen.
You can choose here to either copy to clipboard, which would give you the option to add a previous license file. You can also choose to Save As which will allow you to save the license file to your server, as default for Windows this is C:\Autodesk\Network License Manager\
Or, Send and Close. This will send an email to the contract manager with the new file attached and close the license file. Please make sure when saving the file it is saved as a .lic file and that you save it in the correct location.
There are a couple of alternative ways to generate license files but this is the simpler way, and direct from your own Autodesk Account, in just a few clicks.
For more information on this blog post, please complete the below form: