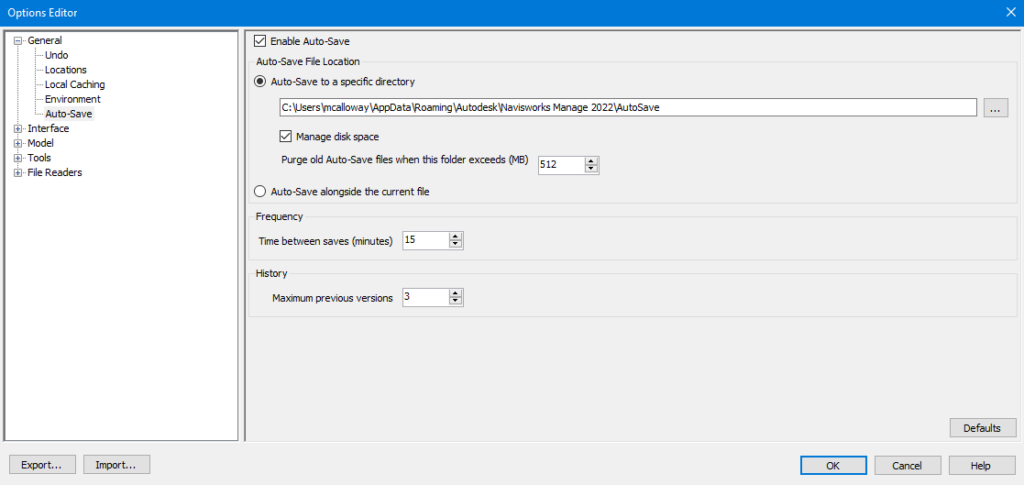
Looking for the Autosave settings in Navisworks? in this short post I will show you how to access the Autosave settings and what you can change.
Navisworks has a large number of settings you can change however the Options window can be a little over loading for the casual Navisworks user. The Autosave settings are relatively easy to find and the default settings are pretty much what you would want but should you need to change a setting such as where the Autosaves are stored here’s how.
While you are here dont forget to check out our other great blog post on the Man and Machine Blog.
How To Access The Autosave Settings
1. Go to the main menu and click Options at the bottom.

2. On the left hand side expand “General” and then left click Auto-Save.

The Settings Explained
Enable Autosave
This tick box is a simple enable/disable feature of Autosave in Navisworks.
Auto-save to a specific directory
Allows you to specify a specific location in which the Autosaves are stored. With this you can also enable Manage Disk Space which allows you to control how much space the autosaves will use before it starts purging old autosaves.
Auto-Save alongside the current file
Instead of saving into a specific location, Navisworks will store the autosaves in the same directory as the project location.
Frequency
This allows you to set in minutes how often Navisworks will autosave your project.
History
This allows you to control the maximum number of backups for a project wich are kept before navisworks starts purging the oldest autosave.
Summary
Navisworks gives you a nice amount of control over your autosaves such as frequencey and location. Although you can completely disable the autosave feature, I wouldn’t recommended that you do this.
For more information on this blog post or if you have any other questions/requirements, please complete the below form: